Photo Frame Clock....one for me please!

Thanks to Holly's post today over at Decor8 - I just bought this interesting photo frame clock for my home! I'm thinking of placing it in my family room behind the tv. I was going to get all white frames (which they have) but I already have a white wall. You can purchase this frame clock from a company called Dutch By Design. It cost me a total of about $98 USD (shipping included). Now to figure out what to place into each frame....decorative paper, more artwork, hmmmm

Google+ Pinterest

Another DIY Project...Deer Head

I received my small wooden deer head the other day from Hart & Heim. If you haven't seen their site, check them out! They have some really great & unique products for the home! After getting an email from a friend about 'Dorm Decor' by Chronicle Books (Being released on March 25th) I went to their blog. Of course, I came across this perfect DIY project involving a deer head (not a real one of course, must stay Green). Anyhow, I loved it sooo much I wanted to share it here...in case you'd rather make one, then buy one. I haven't decided if I will make my plain wooden one into a colorful piece....but it sure does look nice!
Dorm Decor by Theresa Gonzalez & Nicole Smith, makes a perfect gift for anyone who has kids going off to college.


Here's what you'll need to make this little guy below:

Deer templates
1 20″ x 30″ piece (3/16″-thick) foam core
1 6″ x 7″ piece (1/2″-thick) foam core
60″ length (30″-wide) wrapping paper
1 6″ x 7″ piece of contrasting paper
Craft knife
Cutting board
Spray adhesive
Picture-frame hanging wire
Awl

For the ENTIRE DIY Project below visit the Chronicle Books blog.

Have Fun!
Google+ Pinterest

My DIY Frame & Fabric Inspiration Board

After being inspired by Kim's board over at Desire to Inspire this weekend, I decided to make one for myself! ! It was pretty EASY so I thought I'd share how it was done...First find a frame that you like, and embellish or paint. A good place for frames are antique stores or even Michael’s craft stores. I got this wooden one on Ebay for about $55. 

Use a good ENAMEL paint and if you can, cover it with a clear, semi-gloss coat to protect it.  FABRIC INFO:  (thanks to Nina, This fabric I used is by Alexander Henry, it's called 'Diamond Eye'. I got it at JoAnn's craft store)


a3080.jpg

Next, buy a 2’x4’ hardboard from a home improvement store (this one was $3.22 from Home Depot). Hardboard is a composite that has one very smooth side and one rough side & is what pegboard is made from. Cut the hardboard to about 1/2” from the edges of the frame. Use a good box cutter and a meta straight edge to do this. My guy helped with this part. 

You might have to first score it and then cut harder to get through the board. Lay the hardboard smooth side down & place the frame on it. Arrange the cork tiles on top of it & cut them to fit. Leave as few gaps as possible and offset the tiles so that you don’t get a long seam anywhere. Make sure that the cork slides under the rim of the frame.

Using a clear craft glue (this one I used Beacon’s 3-in-1 Advanced Craft Glue which works well on cork) affix the cork to the rough side of the hardboard. Use the glue liberally so the cork doesn’t slide later on. Let it dry for 10 minutes.


Iron the fabric you want (use finishing spray for a crisp iron) to use and then lay it out over the cork making sure it reaches at least 1” past the edge of the cork, even all the way to the edge of the hardboard.


Fold down half of the fabric. Run a heavy bead of glue along the edge of the corkboard then all over the interior. You should criss-cross the threads but don’t glob it too much – the fabric needs to adhere but not have solid spots. Unroll the fabric onto the glued section carefully, make sure any pattern is aligned properly, then smooth out the fabric over the glued cork. 


 Don’t stretch it too hard, just smooth it.

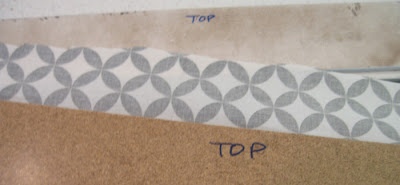
Repeat the step for the bottom half with a small amount of overlap. Do the last bit of smoothing and let dry for 10 minutes. Lay the frame front down on a hard surface covered with a towel or something that will not cause it damage. Place the hardboard piece on top of the back of the frame, fabric facing down, and align it (note in the photo that I wrote TOP so that I knew which side matched which).


Using 5/8” or 3/4” wire brads, nail the edges of the hardboard down to the frame, about once every 3-4”. Using the box cutter, trim off any excess fabric.


To mount it: you want it to be flush to the wall. Locate the studs nearest to where you want to mount it and mark 4 points on the frame where it can be nailed through, near the thinnest part of the frame. You’ll need at least 2 on top and 2 on the bottom for best results. Drill a tiny hole through the frame at all 4 points and using 2” finishing nails (or larger), mount it to the wall making sure you hit the stud. Use another nail to push the finishing nail into the frame slightly. Cover the top with wood putty and apply a small amount of paint to cover it (or in a pinch, use White Out like I did).

And there you go- an easy and pretty framed cork board that cost less than $40 for all the materials!


*By the way, this is what my workspace wall looked like before.

Google+ Pinterest

My Home in Progress...

So far, I've added some new art over my new dining room table. I'd like to add more down below and obviously in the EMPTY frame. In the meanwhile, I'll be searching for more art... Currently three of the pieces on this wall are from my MadeByGirl Etsy shop. Any suggestions? Any other items I could add? Below is my sofa, (which I moved from my main living room into my family room). I got the two colorful cushions from Pier 1 Import, can you believe that?? They remind me of some of these Anthropologie cushions I wanted, but didn't want to spend $100 for! These were reasonable at $30-$40 each. I will keep updating & posting as I move along.
  *View more of my home here.
IMG_3087zz.jpgIMG_3079zz.jpg
Google+ Pinterest

Her home, her work....Saidos Da Concha.

Constanca is her name - she's Portuguese and creates items such as Bags, bibs, coasters purse organizers, aprons & much more! What a talent! She now resides in Lisbon in her beautifully decorated flat. She was kind enough to share these images with all of us of her home & work. You can purchase her pretty clutches at Saidos Da Concha -her Etsy shop! Thanks Constanca. : )

room5.jpgparede2.jpg kitchen3.jpgkitchen5.jpg

spare room4.jpgliving room corner.jpg

multicolor4peq.jpg

il_fullxfull.57468869.jpg

clutches.jpg

linen clutch.jpg

blue clutch.jpg

You can find out more about her via her blog here.

*If you have a creative looking home & want to share with my readers, please email me at jen@madebygirl.com.
Google+ Pinterest

Her ART on my wall...

One of my favorite new artists is Mati Rose McDonough from San Francisco. I really LOVE her work!! My two favorite prints are the peacocks (I will Follow you) and the Elephants. I'm currently looking forward to receiving her Peacock print soon for my wall of art, can't wait! She also has a blog you may want to check out for inspiration. To purchase her awesome prints, visit Suspect Shoppe.

Picture 6.jpg

(Photo above by: Kelly Rae Roberts)

3102800045_cf1a9fa76b_o.jpg 3257473122_f07aeca304.jpg
3096311027_c58f9e7c69_o.jpgil_430xN.51687208.jpgil_430xN.19249073.jpg
Google+ Pinterest

Did I just go Orla Kiely?!?!

Did I just go Orla Kiely?!?!?!? How did this happen? Anyhow, I was at a Target superstore here in Las Vegas and came across quite a few of her things. I was looking for bins that had nice colors....and these were the only ones that stood out, so I bought 5. I admit, I'm not a huge fan (yet) of her line, however, I do like some of her designs & colors. For example, these are some of my favorites below. I really LOVE how they look in my office! AND....I am kind of digging this tote below, I found it at Daytrip Society. I also put up my curtains, you can see them in the first pic (black & white fabric).

Google+ Pinterest
Related Posts Plugin for WordPress, Blogger...